
My 1969 MGB #182608
Woo-hoo! It's in new paint! Maybe one day I'll get around to documenting the marathon effort that took. Its maiden voyage in its new clothes was to MG2006 in Gatlinburg. I drive it about 5000 miles a year, sharing duty about equally with the (yawn) Honda.
2010
-
21 Feb
I'm really getting tired of this....

It was a beautiful Spring-like Sunday morning, and I was out driving, minding my own business. A woman in a blue Ford Windstar had been tailgating me for a while, and to tell the truth she had been making me nervous. Anyway, I stopped at a stop sign (at a T intersection no less) to turn right. She didn't stop. Well she did, but only after he brief research project into the physics of inelastic collisions.
This makes the third time the car has been hit in that corner. At least this time it didn't shove the taillight a foot toward the front. Still, it's going to take a fender, a rear body panel, a bumper blade & overrider, a taillight, and probably some other bits and bobs I've not yet considered. Rats.

2008-2009
-
Ok, I'm slack. I admit it. I've been lazy about updating this page. But there have been a number of items I've done to (and around) the car over the last couple of years:
- New garage
- New engine
- O/D transmission
The garage has been wonderful! No more lying in the gravel, swatting bugs. Yippee!
The engine was a matter of necessity. I knew the bottom end was tired. It had ca. 150k miles on the clock when I plopped it in in 1998. So it was approaching 200k when it finally sighed and said, "Enough." It had been using increasing amounts of oil -- I think that's what caused the valve to burn back in 2007. I did a valve job but didn't touch the bottom end. So the cylinder pressures were increased but the bottom end was still tired. We drove the car to visit my folks in SC and on the trip back it showed its displeasure by suddenly using massive quantities of oil. I parked it until I could build the engine.
My rebuild specs were pretty conservative. I did some porting work on the head, dialed in the cam a few degrees advanced, and bored it 0.040". Otherwise, it's stock -- stock compression ratio, stock cam profile, etc. But I paid very close attention to detail when screwing it together, and so far it's paid off. I get 30+ mpg on the highway (partly due to the O/D), it runs smoothly and quietly, and it's putting out 78 hp at the wheels with 88 lb-ft of torque. It's a pleasure to drive!
2007
-
April 25
"Have you lost your mind?!?!" That the reaction I tended to get when I told folks I wanted to remove my oil cooler. But in reality, I believe it does more harm than good. In 1969, it might have been beneficial, but oil technology has improved dramatically since 1969. Modern oils have nowhere near the coking and thermal breakdown problem that oils from 38 years ago had. Think about it -- modern engines stress oil more and run hotter than old our lazy old mills, yet very few modern cars have oil coolers. Heck, even later-model MGBs don't have an oil cooler. I'm sure that the decision to delete it was made more on cost savings than engineering, but if it was stricly necessary, MG could not have deleted it. I'm not entirely convinced it was ever much more than a marketing gimmick -- "See how exotic and high-performance it is? It has an oil cooler!" Oil that is not hot enough does not drive out unburned fuel or water from combustion fast enough. The fuel dilutes the oil and reduces its lubricity, whilst the water combines with combustion byproducts to form acids that eat away at the engine. Plus, there are two opportunities for hoses to blow and cause a catastrophic oil loss. That's why I say it does more harm than good.
Until today, I'd been keeping my oil cooler blanked off almost year-round. Earlier this week, I had a local hydraulic shop (Raleigh Gasket and Hose) make me a bypass hose. They copied an example from a later MGB. It cost a little more than the equivalent piece from Moss et.al., but I'm more comfortable that this one is well made. I wanted to use one of the metal pipes installed on 1979-80 MGBs, but it fouls my oil pressure sender. If I ever convert to a mechanical gauge, I'll switch to the metal pipe. I put the replacement hose on today. The engine bay is a little less cluttered (not that I much care about such things), and the airflow to the radiator is significantly improved. I'm curious to see how much cooler it runs this summer! ;-)
-
Mar
I drove the car to Flying Circus English Cars to be one of the demo cars for a tech session Max gave on ingnition systems. He was looking for a car in reasonable nick with a near-stock ignition system. (Mine as a Pertronix Ignitor and a Bosch blue coil but is otherwise stock). While it was there, he hooked it to their oscilliscope and exhaust gas analyser. We saw some odd but not terribly alarming numbers -- #2 had slightly lower ignition voltage and #1 had slightly higher (relative to #3 and #4, which were both about the same). Also, the unburned HCs were a little higher than expected. Max suggested that I check my plug wires and consider a set of non-resistor plugs. As I was leaving FCEC, we noticed that it had a hint of a rhythmic miss at idle. On the drive home, all seemed well..... UNTIL. I was on the interstate and was starting up a long, gently incline. The car started missing badly and was obviously down on power. I pulled off at the top of the hill and did a little parking lot diagnosis. Cylinders 1 and 2 were both dead holes. I pulled the plugs -- they looked fine but I put in new ones anyway; no change. Swapped wires around; no change. Popped the float bowl cover off the front carb; everything looked fine. Pulled the valve cover off; everything looked fine. Did a "poor man's" compression test (pull the wire off the coil and spin the engine with the starter, listening to how even the cylinders sound). It was pretty obvious one cylinder had no compression. So I pulled each plug in turn and repeated the test. I found that #2 had no compression. That's when I called for a tow.
When I got it home, I cobbled together a leakdown tester and found massive leakage into the exhaust. I presumed therefore that I had burned a valve, and when I pulled the head, that's exactly what I found.

I'm not sure what caused it to burn. My guess is that there was some kind of deposit that formed on the seat that prevented the valve from seating properly, and it eventually overheated and burned. I think that's what was causing the symptoms I saw at FCEC -- I was getting low compression in #2, which lowered the firing resistance and thus the firing voltage, and I was getting unintended EGR into #1, causing the mixture to lean out and thus increase the resistance and voltage. Other than the blatant defect in the valve, there were no other problems you wouldn't expect in a 35-40k mile head. I had Walker machine in Raleigh go through the head and then I plopped it back on. So far, so good!

2006
-
Mar-Jun
After declaring the task of readying the CGT for MG2006 a lost cause, I started in earnest on the B. Here are some random in-progress shots. This job took much more than I would ever have imagined, especially since i started with a basically sound, original car. Virtually every spare moment I had was spent on the repair (and many spare moments I didn't have -- I lost a lot of sleep and nearly burned all my vacation before the trip! My wife could tell you stories of me in the yard, working late at night under some cheap halogen worklights. We left for Gatlinburg at 6:00 am Tuesday, Jun 20th. I was still turning wrenches at 11:30 pm on the 19th! I did save one part (one of the plastic plugs on the door for the vent wing frame bolt) for Tuesday morning, just so I could say that the car was not completed until the day we left!
So anyway, here are the shots. (1) The front wings removed. (2) The front part of the right sill was rotten, so I fabricated and installed a patch panel. (3) The rear section was also rotted, along with the dogleg. Here are both cut away. (4, 5) I made a patch panel and installed it. (6) I welded up the ragged speaker holes in the rear bulkhead, then (7) prepped and primed the cockpit. (8) Both front wings needed repair. Here's a Steelcraft repair panel trial-fitted to the right fender. It was a little long and the shape wasn't quite right, so it took a little fitting. The left side was similar. (9) With the help of a local club member (thanks, Tom!!!!), I cut away the crash-damaged quarter panel and (10) welded on a section cut from a parts car. (11) A detail of the quarter after it was smoothed and primed. There's a little filler in there, but it was mostly metal-finished with a hammer and dolly and a shrinking disk. Lots of discussion on shrinking disks can be found on MetalMeet.com. (12, 13) The body in primer and paint. (14) Almost ready to roll! This picture was taken 19th June, 2006.
It's still not completely finished. I've not yet buffed it, so there is still some orange peel and a little trash here and there that needs to be removed. And there are still a few rubber bits to be replaced (vent wing seals, etc). But it's come a long way!

1

2

3

4

5

6

7

8

9

10

11

12

13

14


2005
-
July 4 weekend
Finally put in the left floorboard. [Aside: A lot of folks don't know this, but "left" and "right" on a car are always referenced by the way the car is facing, not the way you're facing. If you are looking at me, my left and right hands don't jump from one side of my body to the other depending on whether you're looking at me from the front or the back. My right hand is always on my right relative to my body, not yours. Likewise, a car's left and right are relative to its body. So if you're facing the car from the back, the car's left is to your left. If you're facing the car from the front, the car's left is to your right. That's just a little pet peeve of mine. ;-)] I've had this floor panel about two years now. The right one got done January 2004 (see below)
So here's the deal. The old one was in pretty bad shape (1..3). The red marks indicate the extent of a crack I didn't know I had -- that explains with the seat sometimes felt like a La-Z-Boy. I removed the old one with judicious application of crude implements: hammer, chisel, grinder, and jack (4). Once the old one was out, I hit everything with a wire wheel on my angle grinder and then primed the flanges with zinc-rich weld-through primer (5). Fortunately my sills were in good shape, with only some surface rust. While the primer was drying, I punched lots of little holes (about 150) in my shiny new floor pan (6). These BMH pans are nice, BTW. They come with the scuppers and all hardware already attached and are primed with e-coat primer. Since my flanges were sound, the panels fit well. If your flanges have been attacked by tin worms, the aftermarket ones with the raised flanges on the pan might be a better choice. I set the pan in place and screwed it down with lots of self-drilling sheet metal screws. I then made lots and lots of Welds I Am Not Proud Of. Once they're ground down (7,8), they almost look respectable, though. I hit all the raw and rusted metal with POR-15 (9) and then installed the sound deadening (10). Eventually, I'll paint it all green, but for now, it's hidden under the carpet...
I took out the pedals to make room while I was putting the floor in. When I reinstalled them, I noticed that there was no seal on the pedal box cover. I got some foam insulation and ran it along the pedal box flange before putting the cover back on. Man, what a difference that makes! I was amazed at the amount of hot air that wasn't flooding into the footwell afterward!
The requisite photos. Collect all 10!

1

2

3

4

5

6

7

8

9

10
-
January 8
Not much to report since the last entry until now. Since May of last year, I've been working tremendous amounts of overtime, and we moved. Car time has been a little hard to come by, plus, to be honest, it hasn't really needed much attention.
That's not to say I haven't been playing at all, though. I had a local exhaust shop weld in a bung for an O2 sensor (they charged me far too little for the job -- thanks, guys!!!), and I'm playing with an air/fuel ratio gauge as a tuning aid. So far, it looks promising. Yesterday I checked the valve adjustment, adjusted the ignition timing to 34º advance at about 3800 RPM (vacuum disconnected), and then used the meter to set the carbs. It seemed like if I shot for stoichemetric, I'd get a little stumbling at idle and the resultant misfire would send the readings all over the gauge. If I set it for about two lights into Rich, the idle would smooth out and the reading would stabilise. Checking via the lifting pins, this setting is considerably leaner than I've been setting it. Then, I went out for a drive. I want to experiment more, but it appears that under steady state cruise conditions, it's off-the-gauge lean off-idle up to about 3000 RPM, after which it's about two LEDs into Rich. I think I'd like it a little richer at lower RPM, but for economy, I don't necessarily want it at stoichemetric either. I need to do some more research to find out exactly what the individual segments of the display are telling me. Ferinstance, how lean is the leanest LED in Lean? Now, where'd I put that paper that came with the gauge?
Incidentally, the gauge is an Autometer unit purchased locally. I found it mail-order at Summit Racing, but by the time you figure in shipping, the price difference was a wash. Besides, there's something to be said for instant gratification. The O2 sensor was the cheapest heated sensor I could find. It's a Bosch 13953, and one of the many applications is 1989 Ford Mustang LX L4 2.3 Liter FI. I didn't have a connector for it of course, so I chopped of the supplied connector and used the time-honored Lucas bullets. With enough silicone grease, I'm hoping that the connectors stay clean and I won't lose signal. (CAUTION: Silicone poisons O2 sensors. Keep anything containing silicone well away from the business end of the sensor, and don't use RTV gasket sealant.) I ran wires up to the fuse box for the heater circuit, and a wire into the cabin for the signal to the gauge. To power the gauge, I used a cigarette lighter plug. I can attach the gauge to the windscreen centre rod for driving, and when I'm done, the gauge comes out and the wires get tucked away.
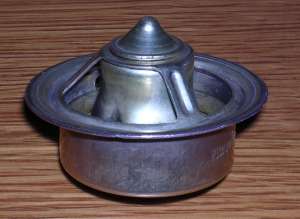
While I was piddling about, I also installed a new thermostat. I had put in a RobertShaw Balanced Flow Tstat, (part no. 330-195, 195ºF, listed for small-block Chevy applications) along with a thermostat blanking sleeve as suggested to me by Bob Muenchausen and explained by Barney Gaylord. I had read somewhere on the internet that you should drill a small hole in the tstat to allow a small amount of coolant to circulate so as to avoid extreme thermal shock to the head when the tstat opens. Just shows to go you that you can't always believe what you read on the internet. With a 1/8" hole in the tstat, the engine never reaches temp in cold weather. The bad news is that AutoZone no longer sells the RobertShaw tstats, so I had to install a conventional Stant tstat -- again, a 195ºF sbc unit. It comes to temp much faster now, but with the ambient temps in the 60s and 70s, it's hard to know how much difference it will make at 20ºF ambient. Time will tell....
UPDATE, 2007: RobertShaw no longer makes the thermostats. They sold the rights to Cooper Automotive. Apparently they're still being made in Mexico, but I have not seen one in a store. They should be available online. With me new tstat, the engine is never below 'N' on the gauge in the coldest weather, and never above 'H' in the hottest. Typically, the gauge stays right around the 3/4 mark on the gauge. Because I believe that hotter, is better, I'm happy with these results. Have a look at my essay on thermostats and cooling.
Photos for your amusement:


2004
-
May 21
Rats. The O/D slips. As near as I can tell, the cone clutch has gone feet up. When it's warm, I have no reverse and it free-wheels in overrun. So, being a bit thin of wallet right now, I put the original 4-speed back in. At least I can drive it!
-
January
Started the long-dreaded floorpan renewal. I ordered some floor pans from Chris Roop that have been sitting in the corner for a year now, while the floopans in the car were not getting any better. The O/D has started slipping in reverse, so while the car was down I decided that it might be time to begin the bodywork.
I began by removing the right side seat and trim. I then used a heat gun to soften the sound deadening enough to lift it with a putty knife so as to get to the spot welds. I had to dress the weld area with a wire wheel in an angle grinder to see the welds, and even with that it was hard to see most of them due to the rust pitting. My initial attempt at breaking the welds was done with a spot weld cutter from Northern Hydraulic. It didn't last long. So I switched to a large drill bit -- that worked better, but I had to be careful to not drill too deep. I found that if I used a floor jack to lift up on the floorpan, I could put the welds under tension and 1.) see them better, and 2.) pop them apart as the drill weakened the weld. As I got bolder putting the welds under tension, I found that I could tear most of them loose with only the jack, and many of the rest with a combination of the jack and some judicious hammer and chisel work. I got a little too excited on the inboard side though, and tore and deformed some of the thinner metal on the tunnel.
Once the old floor was out, I dressed the attachment points with some deft angle-grinder work, then wire-wheeled the flange all around. When it was nice & clean I painted it with weld-through primer, as I knew that it would have to sit for a few days over New Year's and I was concerned about rust.
After all of the holiday obligations had been fulfilled, I was back at it. I punched a bazillion holes in my shiny new floorpan to plug-weld it in. At first I tried pop-riveting it down before welding, but that turned out to be annoying and slow. Self-drilling sheetmetal screws went much faster. Welding amounted to little more than filling lots and lots of holes. The bad news is that I'm a crappy welder. The last of the welds that I did looked better, but still ugly. Good job the carpet will cover them! I put down a British Motor Heritage sound deadening kit that I got from Moss. It fits great, but it's a little spendy. I've heard that you can buy the same material (or near enough) from MacMaster-Carr for a fraction of the price -- you just have cut it yourself.
Here are some in-progress shots.


2003
-
November 26
Installed the rebuilt heater assembly from the MGC. (I had pulled the C heater and cleaned it up, but it was in marginal shape and I wasn't entirely happy with the paint job I did. So I decided to install it in the B and put the B's heater box -- which is much better preserved -- in the C, once I get that far.) I put all new seals etc. in it and cleaned the heater core. I noticed when I pulled the box apart that the head gasket had blown at some point -- the end caps of the core were ballooned out!
I think I'm getting more airflow now. I've always had sufficiently hot air coming out of the heater, but not in sufficient quantities -- sort of like a hamster panting on your foot. When I pulled everything apart, I found the expected dried and crispy rubber seals. What I did not find was the big thick rubber block on the bottom (BHH389) -- the one that gives everyone so much grief. I didn't find one on the C when I pulled its heater box out, and a fellow with whom I've been corresponding, John Moore, says he didn't have one on his '70 when he pulled his heater out. So, I think the deal is as Chris Betson said over on the MG Cars Enthusiasts' Club bulletin board -- the rubber block appeared when MG stopped using the fibre defogger tubes. Backing up that theory is the fact that the MGB parts book shows only the seal, while the MGC parts book shows only the tubes. Since neither book shows both, it seems that MG intended them to be used separately. (And since the MGB book is newer and shows only the seal, my conclusion is that at some point UniPart superceded the tubes with the seal. It looks to me like the tubes would work much better, though.)
I found an additional air leak apart from the crispy gaskets. My knob had fallen off! (Ouch!) My "Tom's Knob" tube was rattling around loose in the bottom of the plenum. The end of the metal pipe to which it attaches had rusted off. This made a extra heater outlet that the factory did not intend. I dressed the metal and was able to scootch the knob up onto the sound portion and do up the clamp. So far so good -- it's like having at least three more hamsters! Now I'm looking forward to a cold day so I can really test the hamster breath....
While I had some black paint in the gun, I also painted my air cleaners. I still need to clean and paint the blower motor, though. Below are some photos. The paint is PPG Delstar, mixed to Hummer black (no, I don't know why -- I told the paint guy "black" and that's what he picked) -- with a little bit of gloss reducer in it. I sprayed two coats over two coats of PPG K36 Primer/Surfacer.


-
October 4
Took the car to the Triangle British Classic Car Show sponsored by the NC MG Car Club. I took "Best Rolling Restoration"! There were lots of beautiful cars. My car wasn't one of them. Here are a couple of shots:


-
June
The door is still in the same shape -- I got sidetracked on other things. Namely, my top started falling apart. I got a Robbins top locally with a zipped rear window and put it on. The fit was great and the zrw is better than sliced bread! Much more pleasant in the 100 degree temperatures we get around here...
-
March 1-2
Pulled the LH door off the parts car. At first glance, it looked good -- better than the door currently residing on the car (see above). I suspected some filler as the paint was cracked in a few places, but sighting down the door didn't reveal any wavies so I thought the door was straight. Took it home and started sanding to see what I had. Turns out the door was full(!) of Bondo. About 60% of the exterior surface area was coated, and in a few deep dents it was a good ½ in. thick! The oddest dent was a roughly circular depression, about 3 in. in diameter, slightly raised in the center. Imagine the cross-section through the bottom of a wine bottle... In addition, there are about a dozen slap-hammer holes. The good news is that there is no rust worth mentioning. I figured I had nothing to lose by trying to straighten it, so I stripped it down to a bare carcass and started beating on it. So far, it's actually turned out good. If you didn't know better, you'd think I knew what I was doing! And it turns out that banging sheetmetal is quite therapeutic -- I highly recommend it. I'll try to get the digital camera again and post some pictures.
-
February 23
Drove over to a friend's house where I've stashed a parts car, obstensibly to have a look at the left quarter panel. I'm itching to start spraying paint, but I want to fix the body properly first. I think I could continue pounding out the dents on the current panel, but I don't know if I'd ever be truly happy with the result... Still thinking on that one. Anyway, whilst there, I noticed that the glovebox was out of the car and thus the right wiper wheelbox was easily accessible. So I pulled it loose and brought it home. Later that same day, I had put it on left side of the '69. Wow! There's actual tension on the arm now! The blade no longer floats above the glass, but actually presses on it. What a concept!
-
February 8
In doing the previous I decided the best way to remove the tunnel carpet was to pull the passenger seat. (The driver's seat is from the '72 donor car because the vinyl on the '69 seat was shot, but the '72's seats were not bad. The passenger's was original. That means that the driver's seat slides -- the passenger's didn't. UPDATE 2006: Turns out the '72's seats were actually from a RB car!) Removing the seat meant chiselling away the left front mounting bolt -- the only one that hadn't torn out of the floor. Of course doing so tore away the last remaining captive nut. The back bolts were easy to deal with; through bolts with fender washers under the floors. Since the front bolts go into the closed box of the crossmember, they're a little harder to deal with. I didn't want to drill throught the crossmember and use longer bolts for several reasons. The car is already low and I was concerned that I might end up with the lowest part being the bolts. Also, the left bolt looks as though it might have had to go through the wiring/brake/fuel line cutout in the crossmember. Finally, I was worried about promoting rust in the crossmember. So, I got two big fender washers -- big enough to reach sound sheetmetal in the floorboard -- and welded plain hexnuts to them. I then welded the washers, nut side down, to the floorboards. Not ideal, I know, but I want to replace the floorboard soon... So I now have matching seats with reasonable upholstery that and that actually adjust! The '69 seat frames will get stripped, rebuilt, recovered, and reintalled when I do the floorboards and paint.
-
February 8
After more discussions on the MG Cars Enthusiasts' Club bulletin board, I learned is possible to change the switch without dropping the gearbox (if you're lucky). I was lucky. Also, the switch itself is okay -- it turned out to be an adjustment thing. Seems the factory installs two fibre washers under the switch. Due the wear, I suppose, the switch gets to the point that it's not fully depressed when the gearchange lever is in the 3-4 gate. I removed one washer, reinstalled the switch, et voilà! -- working o/d. Incidentally, for those of you at home keeping score, the part number on the switch is 31824A, date code 4871. My parts book calls it 13H2154 and says it's the same as the reverse light switch.
The method for getting to the switch is as follows:
- Support the gearbox with a jack and unbolt the crossmember. Lower the gearbox as low as possible. It will rest on the welded crossmember.
- Remove the shift knob and gaiter. Peel back the tunnel carpet so as to access the "cover-gearbox-remote control" (the bit that the gaiter trim screws into). Remove the cover.
- Looking into the hole towards the front of the car, on the top left side of the gearbox you'll see the switch facing you (terminals towards you). In my case I was able to reach in with a pair of Channellock® pliers and loosen it enough to unscrew it by hand. YMMV.
- Installation is the reverse of removal. (Don'tcha hate it when the books say that?)
-
January 26
Wired a telltale into the wire going from the O/D inhibit switch to the solenoid. I found I could make the light wink on and off by wiggling the shift handle, so it's pretty clearly the o/d inhibit switch at fault. From discussions on the MG Cars Enthusiasts' Club bulletin board, the gearbox must come out to change the switch. Moral of the story: The switch is $12. Don't reuse your old one.
-
January 11-19
Removed engine and trans in order to put in the O/D gearbox from the parts hulk. Two+ solid days work, plus a bit more waiting for parts.
Items required:
- 2 x GE x7193 E xhaust Donut Gasket
- 1 x AHH8536 Oil Cooler Hose, Cooler to Filter
- 1 x AHH8537 Oil Cooler Hose, Cooler to Block
- 2 x ??? Oil Cooler Strap
- 1 x GSD151 Speedometer Cable
- 3 ft Yellow Wire
The speedo cable was the only bit that had to be changed due to the transmission change. The oil cooler lines were just tired, and the donut gaskets need to be replaced when the manifold and downpipes are separated. I did not do the clutch as I had replaced it when the piston broke. I did inspect the (roller) release bearing and it looked fine. Hoses, etc are also fairly fresh, as is the coolant which I reused. The wire goes from the group of connectors at the right side firewall to the o/d override switch, and thence to the solenoid.
Notes: I had a time with the trans crossmember. Careful scrutiny of the parts book and repair manual revealed the secrets. The crossmember has one "flat" edge and one "cutaway" edge -- the flat edge goes to the rear of the car. The plinths for the trans mounts have two holes in each one -- the mounts go in the rearward holes. The piece that the parts book calls "bracket-top-vertical engine tie", part number AHH8431, goes with the mounting pads offset to the rear, and the "bracket-bottom-vertical engine tie", part number AHH8432, goes with its mounting holes offset to the front of the car. The outboard crossmember mounting bolts seemed to fall perfectly between the forward and rearward sets of mounting holes, but could be persuaded into the rearward set with only the mildest cursing. (Addendum -- just looked in Linsday Porter's "MGB Restoration Manual" and there's a lovely picture of how it all goes together. Wish I had looked there first! Porter also talks about slotting the mount holes in order to ease installation, but I didn't find it necessary. As always, YMMV...)
Report: Initially the o/d did not work. I verified power to the solenoid, but the o/d would not engage. After a bit of driving, it seemed like it would try to engage but would immediately pop back out. I drained about a pint of oil out of the box and replaced it with ATF, theorising that the o/d is just gummed after having sat for the 5 or 6 years I've owned it, plus who knows how long before. On the drive in this morning, it mostly worked. Once or twice it was reticent to engage, and once it disengaged itself whilst under load. I'm hoping that as I exercise it it will improve....


2001
-
October (2)
Decided that while rear was definitely too high, front looked too low. Replaced front springs. Car now more level, but rear still too high. I expect it to settle some, but not enough.
-
October (1)
Driving home from work noticed that the steering wheel was noticeably cocked when travelling straight, although everything seemed otherwise normal. Got home and realised that the right rear wheel was set well back in the wheel arch. Discovered top leaf of right spring had broken. Replaced rear leaf springs and bushes. Surprise! Rear of car too high. Sticker on springs said "Made in England."
Previous Repairs
-
1998-9

I had purchased a basket case 1972 B for the O/D transmission in it. I pulled the engine, did a "Spray and Pray" rebuild (new conn rod bearings, new external gaskets, and some spray paint), put my reworked head on it, and plopped in. As of Jan 2003 it is still going strong, with good oil pressure and minimal oil consumption. (Oh, and the graphitti on the donor? That was for a Moss Motors photo contest. I got as far as spraypainting that on the car and then got distracted. Maybe next year...)
-
1998
Driving to work on I-40, something went "BANG!" Had the car towed to Flying Circus English Cars (my employer at the time) and found this: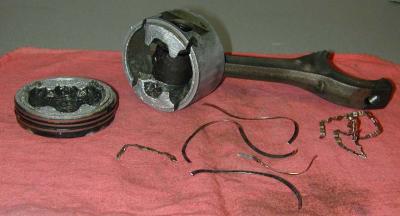
Number two piston had parted at the oil control ring groove. Incidentally, not long ago I ran into the last person to drive this car before me. I told him about what had happened and his comment was, "Oh, it did that again." I think I know what the previous ham-fisted repairs were all about!
-
1997
August: Got rear-ended on Atlantic Ave. I was sitting still at the time. Insurance company totaled the car this time. I pounded the dents back out. I briefly considered adding 10,000 watt carbon-arc stoplamp bulbs so that people would quit hitting me. Decided that the MG didn't have enough oomph to pull the requisite diesel generator. The second shot is of the same quarter panel and was taken 06 Jan 2004, after I had been pounding on it some more. Not ready for paint yet, but better than it was!


May: Got rear-ended on Hillsborough St. I was sitting still at the time. Damage was minimal, and as I was planning on repainting the car anyway I did not get the dent repaired.
-
1995-7
- Entirely new hydraulics (brake and clutch; filled with DOT 5 fluid)
- Had to cut off stuck LF wheel.
- New fuel tank and sender; new Su fuel pump.
- Rebuilt carbs (used oversized throttle shafts)
- Discovered upon cranking that head gasket had been replaced (improperly). The giveaway was the geyser of coolant coming up past the head hold-down nuts. Pulled head, had valves done, replaced stripped head studs, reinstalled head.
- New tyres (of course.) Got a deal on Michelin MX4s from my place of work.
- Installed Falcon Big-Bore Stainless exhaust system.
- New Lucas alternator. Converted plug as per Moss catalog.
- Made carpet kit from cheap Pep Boys roll carpeting. Crude but passable.
- Threw rear u-joint. Replaced both front and rear.
- Rebuilt kingpins; installed rebuilt front shocks; installed new outer tie rod ends
- Installed new Su fuel pump. Got tired of having to get out and beat on the old one. Even had to crawl under and do it in a kilt once...
- New canvas hood.
- New Dunlop 72-spoke wire wheels from Moss
- New rear hubs.
-
1994
Brought car home from Saxapahaw, NC.
Here's my 1969 MGB as I found it in about 1994. It belonged to a friend who acquired it as a parts car to support her 1974 MGB. She never needed anything from it so it was still intact. The last date of inspection was 1980. I took it in trade for some work on her '74.


